November 30, 2011

My Work Has Been Published!

I hope it is ok to sound my own horn but I just had to give a shout out about the Winter Issue of Pat Winter's Crazy Quilt Gatherings Magazine!  I had submitted some of my work to be featured but had not heard whether or not it made the cut.  I was afraid I had sent too much but when I saw the magazine was out and clicked through the preview pages, I had a 2 page spread!  I was overjoyed!!  I could not believe it!

If you are a crazy quilting nut then you have to go over to Pat Winter's blog and see what she has been up to!  Her work is fabulous and really inspires me and a lot of other stitchers!  Check out what the craze is all about  concerning her BoHo Bags!


Head on over to MagCloud and get your copy!  There are tons of fantastic articles inside along with how-to's and lots more eye candy!


Thanks Pat for making me a part of your newest edition!!

I also wanted to let everyone know that I am adding new stock to my website over the next few days.  I worked on the site a good while yesterday and will work on it again today.  I think I am going to move my site in the next few weeks but will let you know when I do because it will be down while the transfer of domain goes through.  If I do move I will be listed under Quiltshops.com!!


___________________________


LOOK who else made the winter issue of Pat Winter's Crazy Quilt Gatherings!!

My good friend Nicki Seavey made the back cover with her beautiful hand dyed laces!!  I have used several of her laces on the pieces I have created over the past 3+ years and continue to use them!   She doesn't dip her laces in the dye...she actually sits with a paint brush and paints the laces as any artist would. That is why her laces are always a step above other laces!

Head on over to her Etsy site, Raviolee Dreams, and see what she has in the shop!  But hurry, her laces do not last long once she stocks the shop! 


November 28, 2011

Quilting Retreats, Birthdays, and Thanksgiving! All Rolled Into One LONG Trip!

I bet my followers have been wondering where I have been!
I have been in Alabama for a week and a half!!

First off I stopped at a quilting retreat!  24 ladies from the HGTV Quilting and Needlework Forum met at the Magnolia Park Retreat Center in Odenville, AL for 4 days of sewing and fun!!  We have a larger retreat for the HGTV Forum once a year but we have started having mini retreats spinning off from the large one and they are just as much fun!  The larger retreat is a more structured retreat with these mini retreats being more relaxed, allowing everyone to sew at their leisure and get to know one another on a much more personal level.

Here are a few highlights from the mini retreat...

We had a jelly roll race!  This was a lot of fun but I hope we have some music next year!  I wound up winning the race and was given a great prize!  I have been threatening to buy one of these bags when I attend a quilt show but just had not.  Now I don't have to! Thank you Linda!


My winning quilt!


Not all.... but a few more Jelly Roll finishes!


This You Tube Link will take you to a short video clip when we started... The camera went dead so we didn't get much! arrgg! - Jelly Roll Race!

I have a fabulous friend who goes by Bluesnail on the HGTV Forum.  Lois was the shortest one at the retreat and took a little jesting from a couple of retreaters... all in fun... and Lois was most hospitable when we needed her to turn the celing fan down a notch or two... Only trouble was, she couldn't reach the pull string... So what was she to do???  but to call on her friends to give her a little boost!


We also have a fantastic friend who loves to have fun who goes by EBGQ on the HGTV Forum! Marlene  and her friends from Maryland put on a fashion show for us! Get ready for some laughter because they put on a fun show!

The last outfit that EBGQ sachets out in is the outfit she was wearing at the Large Houston Retreat in 2008 when she won the Jammie Queen contest!!


We had a lot of fun sewing and visiting and just getting to know each other!  Lots of fun had by all and a staff at the Magnolia Park Retreat Center who took really good care of us all!!

OH! Before I forget!!  This was our mascot!!  Isn't he cute!! NICUNurse (Pam) brought him so we could all sign our john henry's on him! I WANT ONE!!


The retreat lasted until Sunday at lunch but I cut my stay short by one day so I could be at my youngest daughter's 30th birthday celebration on Saturday night!  Her birthday was November 6 and she chose to wait until we came home to have her party!  That made me cry!  Not many people would have their birthday celebration 2 1/2 weeks late!

This is my baby girl with 3 of her closest friends!


I had this cake made for her! She loved it and it tasted soooo good!!


She had given me her t-shirts from high school sports some time ago and I took the time to make her a quilt out of them for her present!  She cried and loved it!!


This was the first year in 9 years that I had been in Alabama ON my birthday!  My girls and their families took me and my hubby  to the Texas Roadhouse Steakhouse for my birthday! It was so good having them all around me for that special day and ON my birthday to boot!

This was the first year in 6 years that I have been home on Thanksgiving so it was a very blessed holiday! Me and my hubby took the girls and their families for Thanksgiving breakfast at the Cracker Barrel!  For lunch we went with my baby girl over to her hubby's parents home and shared a fabulous meal with them!  For dinner we found Pizza Hut open so we stopped in for something a little different than turkey.  One can only eat so much turkey. :)

And then we get back home and what do I find waiting for me in the living room floor!!  A HUGE box full of birthday presents just for me!!  The 21st was my birthday and I am participating in a secret birthday sister swap on the HGTV Forum!  Jackie had my name (unbeknown to me) UNTIL NOW!!  The box was chocked full of things she knew I loved!

M&M's and Andes Mints!
Fill In Puzzle Book
Crazy Quilting Stash goodies!!
PIGS!!!
Puzzle
Rotary Blades
Rope Bowl that she made for me (rope to make my own someday too)
Embrodiered piece of my business logo framed in a pig frame!
A blue boy pendant to use with my Pinkie button for Crazy Quilting!

I was SO overwhelmed with her generosity!!  She really knows how to throw a birthday party inside a box!!!


My friend Carolyn drew this image for my website banner a few years ago and Jackie embroidered and framed it!


I bought the Pinkie button off of Ebay over a year ago and had been in search of the Blue Boy to go along with her!  Now I do not have to search any longer thanks to Jackie!!  I will turn them both in to Cabachons so I can sew them to the crazy quilt block when I create it.


WOW! What a trip!!  We have not been gone that long in a good while!  But by staying longer it helped me not be so tired once we got home.  These in and out trips to Alabama where we go in on a Thursday and leave on Sunday are just too quick a turn around to drive back a 12 hour drive!  I think we will be staying these longer visits from now on!

As much fun as I had, I am also glad to be back home!  Now it is time to get the machines humming and get some things finished before we hit the road again for the Christmas holiday!!

Linking up!

MMM Craft
Just Something I Whipped Up
Motivate Me Mondays

Christmas Quilt Show!!

Darlene, over at SewCalGal is hosting the 2011 Christmas Quilt Show!

Hurry over and link up your blog with a post showcasing one of your favorite Christmas quilts... or more than one if you are feeling quiet Christmasy!

The first quilt I am showing was made for a friend of mine in Maine.  I participated in a Secret Santa Stocking Swap on the HGTV Quilting and Needlework Forum and drew Margot's name.  I had started this quilt for a friend who was having a baby and once I got it pieced, I saw it was too small for a child.  So when I joined the Stocking Swap I knew I would use it for whomever's name I drew!  The original kit had appliqued snowmen for each square but I chose to machine quilt Christmas words in each of the open squares.  Margot really liked it, in fact, I was at a quilting retreat with her on the 17th of this month in Alabama and I asked her about the quilt.  She said she never took it down after Christmas was over last year! :)


These next quilt tops are "in-process" for my grandchildren.  I actually started them last year but did not get them completed.  They have grown a mile so I guess this year they will need an additional border!  better get them finished while the finishing is good!!  acckk!!


This is a quilt I made for my oldest granddaughter on her first Christmas in 2003. She now has a sister so I am thinking I may do her one too! 


And last but not least... This may not be a quilt but I wanted to share them too!  Back in the 90's I made a ton of these Reindeer dolls!  This set went to my beautician, nancy Smith.  As you can see they are about as big as her 2 year old daughter!  I always enjoyed making these babies!  Their clothes and all are handmade and they wear real shoes and socks!


SO!! What are you waiting for?? Head on over to SewCalGal's 2011 Christmas Quilt Show and get your link on!

November 11, 2011

Happy Veteran's Day!

Thank you to all of our veterans and active service men and women who have fought and are still fighting for our freedoms!

Michele over at The Quilting Gallery is hosting a  Remembering Veterans Quilt Contest this weekend and my friend Kim Story and I have a duet quilt in the contest.  Hop over to the site and view all of the quilts and if you like ours best, please give us a vote!

Our quilt is called "Proud To be An American!"

Kim made the top for a combat wounded soldier and asked me to quilt it so I accepted.  I quilted the chorus to Lee Greenwood's "God Bless The USA"  in the border.

And I'm proud to be an American, where at least I know I'm free.  And I won't forget the men who died, who gave that right to me. And I'll gladly stand up next to you and defend her still today.  Cause there ain't no doubt, I love this land... 

God Bless The USA!!!


October 31, 2011

To Cheer You!!

I am tickled to tell all of my readers that a quilt that I made for a special lady has been picked to be a part of Madame Samm's November banner over at Sew We Quilt!!

This is the story that I sent along with my quilt photos.....

The story of my quilt is no different than hundreds of quilts as it was made to warm the heart of a very dear person, a teacher and friend of mine. Mrs. Rebecca Massey was my cheerleader sponsor in Jr. High School and also taught both of my children in 3rd grade. I have learned the utmost respect for this wonderful lady over the past 39 years. This summer she was injured and was taken off of her feet for a few weeks and I wanted to do something to cheer her up. There is nothing like a warm and cozy quilt to melt away any worries and heal the biggest of boo-boos.
It took me 2 weeks to make the quilt and get it sent on it's journey from North Carolina to Alabama. (I moved to NC in 2003 but Bama will always hold my heart!) I received the fabric on August 21 in an order from the Fat Quarter Shop. I had ordered a jelly roll of the same Westminster fabrics, Parisville by Tula Pink, for a quilting retreat that I am going to in November. We are going to do a jelly roll race competition. Upon inspection of my order, I realized they had sent a 27 piece Fat Quarter Bundle of the fabrics instead of the 26 piece jelly roll. Well, we all know how big of a difference that would be in cost! I quickly picked up the phone and called to let them know they had made an error and sent the wrong pre-cut. They apologized many times and said they must make it up to me for their mix up. I assured them that it was not necessary to do this but they would have it no other way. To make a long story short, I came out smelling like a rose when they were finished "making it up to me". They went above and beyond! So while I waited for my jelly roll to arrive, I started cutting out this quilt from the fat quarter bundle for Mrs. Massey. If someone can be so good to me, how can I not, myself, pay it forward.
Quilt name: To Cheer You!
As all of my friends know, I am a rather long winded kind of person. I love to talk and sometimes it can take me a while to tell a story. The story of this quilt is told over the course of 3 posts on my blog. I condensed all 3 posts in to one so you can see and read about the making of the quilt all in one place from the beginning to when it was ready to mail to Alabama. You can read the story below...
___________________________________

This excerpt taken from a post here...
This is my latest haul from the Fat Quarter Shop! I have to tell you they have the most awesome customer service EVERRRR!!  I originally ordered the Little Golden Books prints and a jelly roll for the Jelly Roll race at the retreat.  I bought a jelly roll off of their sale page at 50% off.  When my package came they had sent a Fat Quarter Bundle instead. I called them immediately because everyone knows that Fat Quarter Bundles cost a whole heap more than a jelly roll.  They apologized and apologized and wanted to make it up to me! WHAT!!  I told them there was no need in that but they kept insisting.  
I kept the Fat Quarter Bundle and they sent me a different jelly roll because they were out of the ones on sale.  The one on sale that I ordered only had 26 strips.. the one they sent me had 40 strips!!  OK.. I had paid 11.00 for the one on sale... The one they sent was NOT on sale... and all I did was pay for the Fat Quarter Bundle, which was half off too!! You CAN NOT beat that kind of customer service ANYWHERE people! They are awesome to deal with! And always giving back to the quilting community through sponsored blog giveaways! You don't have to look hard to find a blogger doing a sponsored giveaway from the Fat Quarter Shop! When merchants give back like that, I will always do business with them first!

Just look at my yummy fabrics! Thank you Fat Quarter Shop!
 _____________________________________
This excerpt taken from a post here...

I have been busy over the past couple of weeks, sneaking in an hour here and an hour there, working on this quilt top. I was inspired to make this quilt while on a visit to Sew4Home's blog and seeing this really cute baby quilt!

If you regularly read my blog you will remember this post  where I gave the Fat Quarter Shop a shout out for awesome customer service over a mix up on an order I placed with them!  I came out smelling like a rose when it was over so I wanted to do something special for someone else with some of the fabric that they gave me.

I also have missed the past 2 weeks on tutorials so I decided to mix in a small tute just for you!  I will show you how I apply my borders to keep them from having fullness and walking with me when I try to longarm quilt the top.

First off you need to take 3 measurements across your quilt top.  Decide if you are going to apply your side borders first or your top and bottom borders first.  In this case, we are going to apply the top and bottom borders first.

1. Measure across the top edge of your top, measure through the middle from one side to the other, and measure across the lower edge. (the 3rd line drawn represents the lower edge of the quilt...I thought I got the entire quilt top in the photo but I didn't...sorry)

2. Now..add all 3 of these numbers together.... and then divide by 3.  The number you get will be the length you cut your top and bottom border strips before sewing them to the quilt top...and in my case the length I will need once I finish piecing my strips together for my borders.  Here is my top border, pieced, measured and ready to sew on to the top edge of my quilt.

3. Next... You will need to find the center of your border strip by folding it in half and then mark it with a pin.

4. You will want to find at least one more reference point between the middle and the outside edge of the top, on both sides of the middle,  so now we will bring the left edge of the border strip over to the pin in the middle. We will finger crease the fold to mark the halfway point of the outer edge and the middle pin and add another pin at this reference point.


 Now we have 2 pins in place!

5. And to find the last reference point bring the right side of the border strip over to the center pin.  And as before we will finger crease the fold to mark the halfway point of the outer edge and the middle pin and add another pin at this reference point.


Repeat steps 3, 4 and 5 to the top edge of your quilt top.

6. Now we are going to pin the border strip to the quilt top! With right sides together, match your pins on your border strip to the corresponding pins on the top edge of the quilt top and pin them together!

7. It is time to sew your border strip to your top! You may have a little fullness from one pin to the other and the way I tackle that is to pick up the quilt top and border strip where a pin has joined the two together and slightly..very slightly...tug toward myself to erase any fullness there may be while I sew down to the pin.  Do not manhandle this slight tug or you may stretch your border out of shape.

Be sure your top edges are flush and even and begin sewing!

Tug ever so slightly if needed to erase any fullness!

8. Press the seam allowance toward the border strip once you have the entire border strip attached!

Repeat steps 3 thru 8 to apply the bottom border strip to your quilt top!

Now it is time to add your side borders!!  This is done in the exact same way that you applied your top and bottom borders except now you have the top and bottom borders to add in to the equation!  You will take the same 3 measurements as you took before but you will measure from the top edge of the border strip to the lower edge of the border strip!

Remember to add all 3 measurements together and divide by 3 to get the length your border strips should be!

Repeat steps 1 thru 8 to apply the left side border and the right side border! And then you have a quilt top ready to be quilted and your borders will be straight and have no fullness in them!

How do you like my variation of the quilt on Sew4Home's website?  I actually had a sloober doober but decided instead of using the seam ripper, I would use it as a design opportunity! ha! Can you spot the slip-up?

I hope you have enjoyed this tutorial of how I apply my borders.  There are as many ways to do things as there are quilters so I am not saying my way is the "only" way.  It is just how I do it and it works for me.  I just hope that I can help someone else with my little tips and tricks.
_____________________________________
This excerpt taken from a post here...

This is the top I showed a few days ago!  I had to change out the leaders on my Gammill longarm because it had gotten stretched out of shape and was causing pleating on the backs of my customer work! I loaded this after putting on the new leader just to be sure the problem did not lie with the bottom leader!  I finished quilting it last night using a pantograph and did the binding this morning!

BTW: Leaders are fixed! NO MORE PLEATING!!  I so hate to frog!!

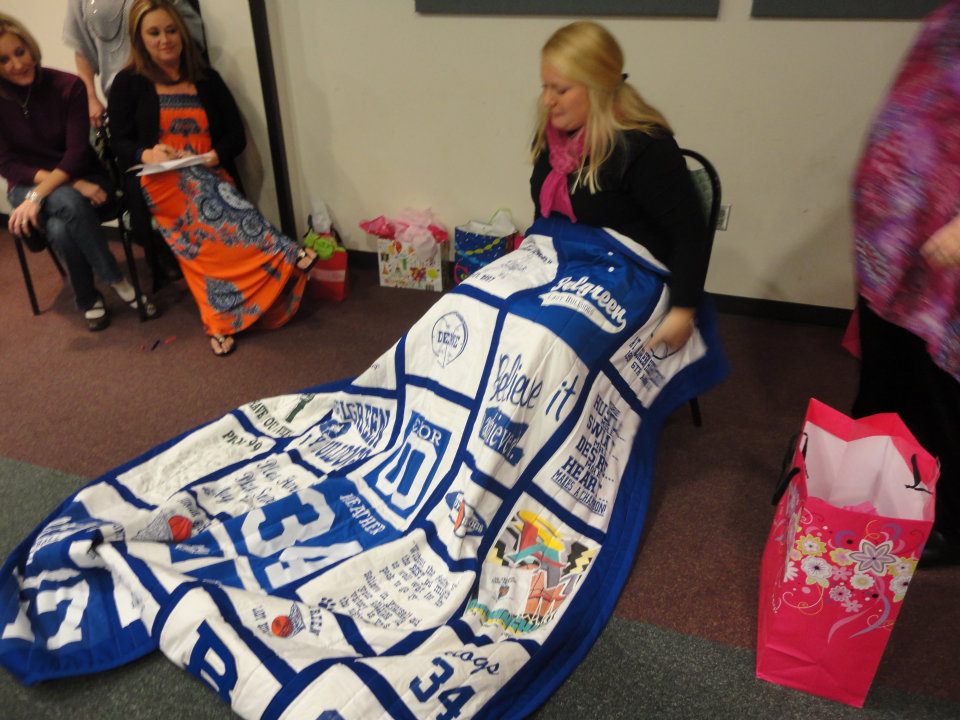
This is going to a very special lady this week!!

And here she is!  

Mrs. Rebecca Massey, all wrapped up as snug as a bug in her quilt!

Thank you so much Madame Samm for choosing my quilt as part of your November banner and allowing me to introduce you to Mrs. Massey! :)

I am linking up over with Amy's Creative Side and the Bloggers Quilt Festival!